Installing PVC ceiling panels in a terrace can transform the space, providing both aesthetic appeal and practical benefits. As a PVC ceiling panel supplier, I’ve seen firsthand how these panels can enhance a terrace’s look and functionality. In this blog, I’ll guide you through the process of installing PVC ceiling panels on your terrace, from preparation to the final touches. PVC Ceiling Panel

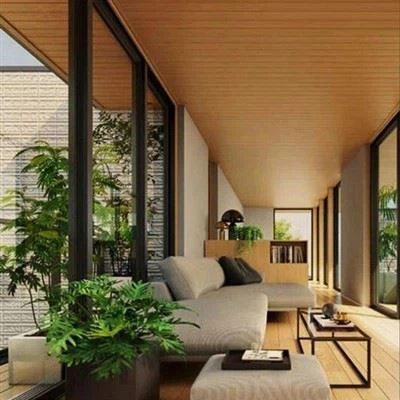
Why Choose PVC Ceiling Panels for Your Terrace?
Before diving into the installation process, it’s essential to understand why PVC ceiling panels are an excellent choice for your terrace. PVC (Polyvinyl Chloride) ceiling panels offer several advantages:
- Durability: PVC panels are resistant to moisture, rot, and insects, making them ideal for outdoor spaces like terraces. They can withstand various weather conditions without warping or deteriorating.
- Easy Maintenance: These panels are easy to clean. A simple wipe with a damp cloth can remove dirt and stains, keeping your terrace ceiling looking fresh and new.
- Aesthetic Versatility: PVC ceiling panels come in a wide range of colors, patterns, and designs. You can choose a style that complements your terrace’s overall design, whether it’s modern, traditional, or rustic.
- Cost-Effective: Compared to other ceiling materials, PVC panels are relatively affordable. They offer a cost-effective way to upgrade your terrace’s appearance without breaking the bank.
Preparation
Proper preparation is crucial for a successful PVC ceiling panel installation. Here are the steps you need to take:
- Measure the Terrace: Start by measuring the length and width of your terrace. This will help you determine the number of PVC ceiling panels you need. Make sure to account for any irregularities or cutouts in the ceiling area.
- Gather Tools and Materials: You’ll need the following tools and materials for the installation:
- PVC ceiling panels
- Measuring tape
- Utility knife
- Saw (if necessary)
- Screwdriver
- Drill
- Wall brackets or furring strips
- Screws
- Adhesive (optional)
- Inspect the Ceiling Surface: Check the ceiling surface for any damage or unevenness. If there are any issues, repair them before installing the PVC panels. A smooth and level surface will ensure a proper fit and a professional-looking finish.
- Plan the Layout: Decide on the layout of the PVC ceiling panels. You can install them horizontally, vertically, or diagonally, depending on your preference and the design of your terrace. Mark the starting point and the direction of the panels on the ceiling.
Installation Process
Once you’ve completed the preparation, it’s time to start installing the PVC ceiling panels. Follow these steps:
- Install Wall Brackets or Furring Strips: If your terrace ceiling is not level or if you want to create a space for wiring or insulation, install wall brackets or furring strips. These will provide a stable base for the PVC panels. Use a level to ensure the brackets or furring strips are straight and evenly spaced.
- Cut the PVC Panels: Measure and cut the PVC panels to the appropriate size using a utility knife or a saw. Make sure to wear safety goggles and gloves when cutting the panels. If you need to make curved cuts, you can use a jigsaw.
- Attach the First Panel: Start by attaching the first PVC panel to the wall brackets or furring strips. Use screws or adhesive to secure the panel in place. Make sure the panel is level and aligned with the marked layout.
- Install the Remaining Panels: Continue installing the remaining panels, overlapping the edges as needed. Use a level to ensure each panel is straight and level. If you need to cut panels to fit around obstacles or corners, measure and cut them carefully.
- Trim the Panels: Once all the panels are installed, trim the edges to create a clean and professional look. Use a utility knife or a saw to trim the panels flush with the walls or other surfaces.
- Install the Ceiling Trim: To finish the installation, install the ceiling trim around the perimeter of the ceiling. This will cover the edges of the PVC panels and give the ceiling a finished look. Use nails or adhesive to secure the trim in place.
Tips and Tricks
Here are some tips and tricks to help you install PVC ceiling panels on your terrace:
- Work in Sections: Install the PVC panels in sections to make the process more manageable. This will also help you ensure that the panels are properly aligned and level.
- Use a Backer Board: If your terrace ceiling is uneven or if you want to add extra support, consider using a backer board. This will provide a smooth and stable surface for the PVC panels.
- Seal the Joints: To prevent moisture from seeping into the joints between the PVC panels, use a sealant or caulk. This will help protect the panels and extend their lifespan.
- Follow the Manufacturer’s Instructions: Always follow the manufacturer’s instructions when installing PVC ceiling panels. This will ensure that the panels are installed correctly and that they perform as expected.
Conclusion
Installing PVC ceiling panels in a terrace is a relatively straightforward process that can significantly enhance the look and functionality of your outdoor space. By following the steps outlined in this blog and using the tips and tricks provided, you can achieve a professional-looking finish that will last for years to come.
Acoustic Panel If you’re interested in purchasing PVC ceiling panels for your terrace, I’d be happy to help. As a PVC ceiling panel supplier, I offer a wide range of high-quality panels in various colors, patterns, and designs. Contact me to discuss your project and get a quote.
References
- "PVC Ceiling Panels: A Comprehensive Guide." Home Improvement Magazine.
- "Installing PVC Ceiling Panels: Step-by-Step Instructions." DIY Network.
- "Benefits of PVC Ceiling Panels for Outdoor Spaces." Outdoor Living Today.
Hangzhou Eastopo New Marterial Technology Co., Ltd.
As one of the most professional pvc ceiling panel manufacturers and suppliers in China, we offer a wide range of products with superior quality. Please rest assured to wholesale custom made pvc ceiling panel from our factory. Good service and reasonable price are available.
Address: Room 304-20, Block B, Building 1,2,3&4, Kaixuan Jinniu Fang, Shangcheng District, Hangzhou, Zhejiang, China.
E-mail: mj@eastopo.com
WebSite: https://www.eastopo.com/